Car Background Photo Editor Tips to Upgrade Your Shots
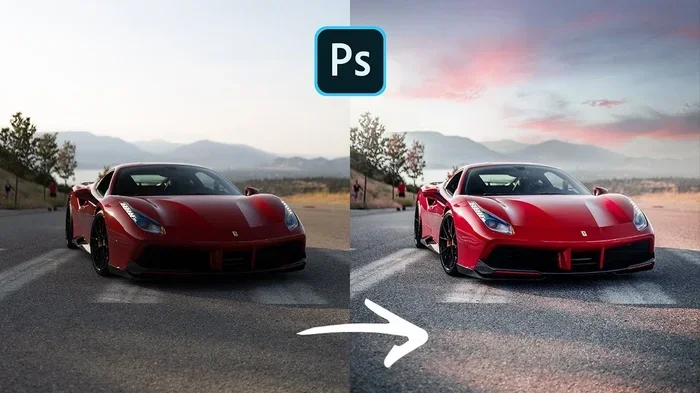
A car background photo editor can completely transform your automotive photos from ordinary to extraordinary. Whether you shoot for fun, sell cars online, or build a portfolio, the right background makes all the difference. This guide covers the best tools, step-by-step techniques, and pro tips to elevate your shots. You will learn how to remove old backgrounds, add dramatic scenes, and make every car look its absolute best. By the end, you will have the confidence to edit car photos like a seasoned professional.
Key Takeaways
- Choose the right tool: The best car background photo editor depends on your skill level and budget.
- Remove backgrounds easily: Modern tools make background removal quick and painless for beginners.
- Match lighting for realism: Blending the car with a new background requires attention to light direction and color.
- Avoid common errors: Rushing the process leads to obvious edits and unrealistic results.
- Use high-resolution images: Always work with sharp, high-quality source photos for the best output.
- Practice makes perfect: The more you edit, the better your eye becomes for what looks natural.
📑 Table of Contents
- Why Your Car Photos Deserve a Better Background
- Best Car Background Photo Editor Tools You Can Use
- How to Remove and Replace Car Backgrounds Step by Step
- Tips for Stunning Car Background Editing
- Common Mistakes to Avoid When Editing Car Backgrounds
- Pro Techniques for Professional-Level Car Photo Editing
- Frequently Asked Questions
- Conclusion
Why Your Car Photos Deserve a Better Background
Let us be honest. Most of us do not have access to a scenic mountain road or a sleek studio every time we want to photograph our car. A car background photo editor solves that problem instantly. You can place your vehicle against any backdrop you can imagine.
Car photography is all about presentation. The car background sets the mood and tells a story. A dull gray wall behind a shiny sports car? That kills the vibe. But swap it for a sunset highway or a clean studio floor? Suddenly the car looks expensive and aspirational.
Whether you sell vehicles online, run a social media page, or simply love showing off your ride, the background matters. Buyers notice details. A messy or distracting image background can make even the most beautiful car look cheap. Editing the background gives you full control over how your car is perceived.
The good news is that you do not need expensive software or years of experience anymore. Today’s photo editing software makes it possible for anyone to create jaw-dropping results. Let us dive into how you can do exactly that.
Best Car Background Photo Editor Tools You Can Use
Not all editing tools are created equal. Some are built for professionals, while others focus on simplicity. Here is a look at the top options for car image editing.
Adobe Photoshop
Photoshop remains the gold standard for automotive editing. It offers advanced layers, masking, and blending tools. If you want pixel-perfect control over your car portrait, nothing beats it. The learning curve is steeper, but the results are unmatched.
Canva
Canva is perfect for beginners. Its drag-and-drop interface makes background replacement incredibly simple. You upload your car photo, pick a new backdrop, and done. It is not as powerful as Photoshop, but it gets the job done for most car enthusiasts.
Remove.bg and AI-Powered Tools
AI tools like Remove.bg specialize in one thing: removing backgrounds automatically. They use smart algorithms to detect the car and separate it from the photo background in seconds. These are great for quick edits when you do not want to fuss with manual selection.
GIMP (Free Option)
GIMP is a free alternative to Photoshop. It may not have all the bells and whistles, but it handles car photo editing well. Layers, brushes, and selection tools are all included. It is a solid choice for anyone on a tight budget.
Luminar Neo
Luminar Neo focuses on AI-driven editing. Its sky replacement and background tools are particularly impressive for automotive shots. If you want fast, stunning results without deep technical knowledge, Luminar is worth a look.
| Tool | Best For | Price | Skill Level |
|---|---|---|---|
| Adobe Photoshop | Professional editing | Subscription | Advanced |
| Canva | Quick background swaps | Free / Pro | Beginner |
| Remove.bg | Instant background removal | Free / Paid | Beginner |
| GIMP | Free full editing | Free | Intermediate |
| Luminar Neo | AI-powered car edits | One-time / Subscription | Beginner to Intermediate |
How to Remove and Replace Car Backgrounds Step by Step
Now let us get into the actual process. Removing and replacing a car background is easier than you think. Follow these steps and you will see a dramatic improvement in your photos.
Step 1: Choose the Right Source Photo
Start with a high-quality original image. The sharper and better lit your car photo is, the easier the editing process becomes. Avoid photos with heavy shadows or motion blur. A clean automotive photography shot gives you the best foundation.
Step 2: Isolate the Car from the Background
Use your chosen tool to cut out the car. In Photoshop, the clipping path method or Select Subject works great. In Canva or Remove.bg, the AI does this automatically. The goal is a clean edge with no leftover bits of the old image background.
Step 3: Select Your New Background
Pick a background that matches the vibe you want. City streets, mountain passes, racetracks, or a simple gradient studio backdrop all work. Make sure the resolution of your new background is high enough to avoid pixelation.
Step 4: Blend the Car with the New Background
This is where many people go wrong. Simply placing a car on a new background photo looks fake if you do not blend properly. Adjust the shadows, highlights, and color tones to match. The car and background should look like they belong in the same scene.
Step 5: Refine and Export
Zoom in and check the edges. Fix any rough spots or color mismatches. Once everything looks natural, export your final image in high resolution. JPEG works for web use, while PNG preserves transparency if you need it.
Tips for Stunning Car Background Editing
Getting the basics right is one thing. Making your car background photo editor work look truly professional is another. Here are some tips that separate amateurs from pros.
Match the Lighting Direction
Look at where the light hits the car in your original photo. If the light comes from the left, make sure your new background has light coming from a similar direction. Mismatched lighting is the fastest way to make an edit look fake. Color correction helps here too.
Add Realistic Shadows
A car floating in mid-air looks unnatural. Add a ground shadow beneath the vehicle. Most editors let you adjust shadow opacity and blur. This small detail makes a huge difference in how realistic the final car showcase looks.
Use a Green Screen for Consistency
If you shoot your car photos against a green screen, you have total control over the final background. Green screens make background removal cleaner and faster. Many professional automotive photography setups use this technique for a reason.
Experiment with Different Environments
Do not limit yourself to one type of background. Try urban settings, nature scenes, abstract gradients, or even dramatic stormy skies. Each environment changes the mood of the car photo background completely. A sporty coupe looks fierce on a rain-soaked road. A classic cruiser shines against a desert highway.
Pay Attention to Reflections
Cars have shiny surfaces that reflect their surroundings. If you change the background, the reflections should ideally change too. Advanced editors can adjust reflection layers to match the new environment. This level of detail is what makes high-end retouching so convincing.
Keep the Original Car Photo Intact
Always work on a copy of your original file. Non-destructive editing lets you go back and try different backgrounds without losing quality. This practice is essential for anyone serious about car photo editing.
Quick Tips for Better Results
- Always start with the sharpest possible original photo.
- Use a background blur effect to create depth and focus on the car.
- Match the white balance between the car and the new background.
- Add subtle lens flare or grain to unify the image.
- Save multiple versions so you can compare different backgrounds side by side.
Common Mistakes to Avoid When Editing Car Backgrounds
Even experienced editors make mistakes. Here are the most common ones and how to avoid them.
Using Low-Resolution Backgrounds
A blurry background ruins an otherwise great edit. Always use high-resolution images for your new photo background. The pixels need to be sharp enough to match the detail in the car.
Ignoring Color Harmony
If the car is red and the background is neon green, the contrast can be jarring. Use color correction tools to bring the tones closer together. A cohesive color palette makes the edit feel intentional and polished.
Overdoing the Effects
It is tempting to add dramatic shadows, glows, and filters. But less is often more. Subtle edits look far more professional than heavy-handed ones. Let the car be the star of the show.
Forgetting the Ground Plane
The car needs to sit naturally on a surface. Forgetting the ground plane makes the vehicle look like it is hovering. Always include a ground shadow or surface reflection for realism.
Rushing the Edge Work
Rough edges around the car are the biggest giveaway of a sloppy edit. Take your time with the clipping path and masking. Clean edges make the entire car photo background swap look seamless.
Pro Techniques for Professional-Level Car Photo Editing
Ready to take your skills to the next level? These advanced techniques will help you achieve studio-quality results from your own car background photo editor setup.
Dodge and Burn for Depth
Dodge and burn is a classic technique used by professional retouchers. It involves selectively brightening and darkening areas of the image. Use it to enhance the car’s contours and make the new background photo feel integrated. This technique adds dimension that flat edits simply cannot achieve.
Frequency Separation for Smooth Surfaces
Frequency separation lets you edit texture and color independently. This is incredibly useful for car photos where you want to smooth the paint while keeping the body lines sharp. It is a staple of high-end retouching in automotive photography.
Composite Background Creation
Sometimes the perfect background does not exist as a single photo. You can create composite backgrounds by combining multiple images. Blend a sky from one photo with a landscape from another. This gives you total creative freedom over your automotive editing projects.
Batch Editing for Consistency
If you are editing multiple car photos for a listing or portfolio, batch editing saves hours. Apply the same color grade, shadow treatment, and background style across all images. Consistency is key for a professional look in any car showcase.
Using Adjustment Layers for Non-Destructive Workflow
Adjustment layers let you tweak exposure, contrast, and hue without permanently altering the original image. This is essential for a clean car image editing workflow. You can always go back and adjust your edits without degrading the file quality.
Frequently Asked Questions
What is the best free car background photo editor?
Remove.bg and GIMP are excellent free options for removing and replacing car backgrounds. Remove.bg handles the cutting automatically using AI, while GIMP gives you full manual control for free. Both tools work well for basic to intermediate car photo editing tasks.
Do I need a professional camera to edit car backgrounds?
Not at all. A modern smartphone can capture excellent car photos that work perfectly with any background photo editor. The most important factors are good lighting and a clean original image. As long as your source photo is sharp, the editing process will be smooth.
How long does it take to edit a car background?
With practice, a single background replacement takes about 10 to 20 minutes. Beginners might take longer while learning the tools. AI-powered editors can reduce this to just a few minutes for simple swaps. The more you practice, the faster you will get.
Can I use any background image for my car photo?
You can, but the best results come from backgrounds that match the lighting and color tone of your original photo. A well-matched car photo background looks natural and professional. Random backgrounds without matching light direction often look fake or poorly edited.
Is car background editing legal for selling vehicles online?
Yes, it is completely legal. Many dealerships and private sellers use photo editing software to enhance their listings. Just be sure not to alter the actual car in ways that misrepresent its condition. Background editing is widely accepted and considered standard practice in automotive sales.
What resolution should I export my edited car photo at?
For web use, export at 72 DPI in JPEG format. For print or high-quality displays, use 300 DPI in PNG or TIFF format. Always keep the original edited file in a lossless format so you can re-export at any resolution later. This ensures your automotive photography looks crisp everywhere it appears.
Conclusion
A car background photo editor is one of the most powerful tools in your automotive photography arsenal. It lets you control the story your car tells through every image. From removing distracting backdrops to placing your vehicle in breathtaking settings, the possibilities are truly endless.
The right car background transforms an ordinary snapshot into a professional-grade car portrait. Whether you are selling a vehicle, building a portfolio, or simply sharing your passion, edited backgrounds make your photos pop. The tools are more accessible than ever, and the techniques are easier to learn than you might expect.
Start with one of the tools mentioned in this guide. Practice the step-by-step process. Avoid the common mistakes that trip up beginners. With consistent effort, your car photo editing skills will improve rapidly. Soon, you will be turning ordinary car photos into stunning visuals that turn heads.
Grab your favorite photo editing software, pick a car you love, and start experimenting today. Your best car photo might be just one background swap away.