How to Reset the Brake System Light on Honda Civic
Learn how to reset the brake system light on a Honda Civic in minutes with this step-by-step guide. We cover the most common reasons the warning light appears, the tools you need, and both OBD2 scanner and manual reset methods. Whether it is a low brake fluid level or a worn pad sensor, you will find the fix right here.
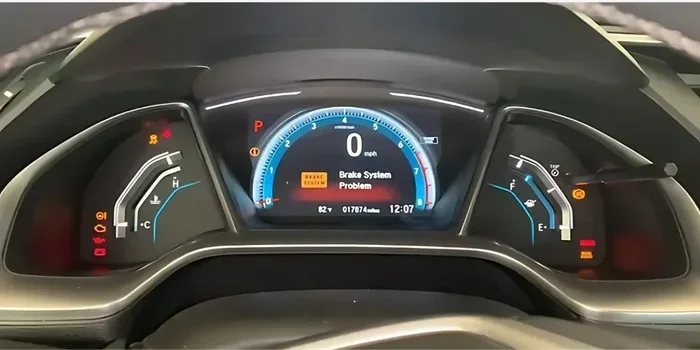
The brake system light on a Honda Civic can be scary. It flashes on the dashboard and makes you worry about safety. But often, the fix is simple. You can reset the brake system light on a Honda Civic in just a few minutes. This guide walks you through every step. You will learn why the light comes on, what tools you need, and how to clear it yourself. No mechanic required for most cases. Let us get your Honda Civic safe and sounding right again.
Key Takeaways
- Reset the brake light yourself: Use an OBD2 scanner or a simple manual trick to clear the Honda Civic dashboard warning.
- Check brake fluid and pads first: Most brake system lights come from low fluid or worn brake pad wear sensors.
- Don’t ignore the ABS light: A persistent ABS or brake warning could signal a serious safety issue that needs a pro.
- Use the right tools: An OBD2 scanner makes resetting fast and accurate, but a manual reset works for minor glitches.
- Prevent future warnings: Regular brake fluid checks and timely pad replacements keep the brake system light off.
- Know when to visit a mechanic: If the light returns after reset, there may be a deeper problem like a faulty master cylinder or ABS module.
📑 Table of Contents
Why Is the Brake System Light On?
The brake warning light on a Honda Civic is not just one thing. It can mean several different problems. Some are easy to fix. Others need a quick trip to the shop. Understanding the root cause helps you choose the right fix. Below are the most common reasons this light appears on your dashboard.
Brake Pad Wear Sensor Triggered
Modern Honda Civics use brake pad wear sensors. When the pads get thin, the sensor touches the rotor. This sends a signal to the car’s computer. The result is a bright brake warning light. If you hear a loud squealing noise when braking, the pads are likely worn down. You may need a full pad replacement. Check out our guide on Do You Need To Change All 4 Brake Pads At Once to understand the full process.
Low Brake Fluid Level
Brake fluid is the lifeblood of your stopping power. The fluid level drops naturally over time as pads wear. But a sudden drop can mean a leak. The brake fluid level sensor sits in the master cylinder reservoir. When the level falls below the minimum, the light turns on. You should check the fluid color. Fresh fluid is clear or light yellow. Dark brown fluid means it is time for a change.
Parking Brake Not Fully Released
This sounds obvious, but it happens all the time. If the parking brake lever or pedal is not all the way down, the light stays on. Sometimes the switch that senses the parking brake gets stuck. A simple adjustment or a new switch can fix this. Always make sure the parking brake is fully released before driving.
ABS Module or Sensor Fault
The ABS light often comes on alongside the brake light. The ABS system prevents wheels from locking up during hard stops. A faulty wheel speed sensor or a failed ABS module triggers the warning. These parts can get dirty or damaged. Driving with a failed ABS system is risky, especially on wet roads.
Brake Light Switch Failure
The brake light switch sits near the top of the brake pedal. It turns on the rear brake lights and tells the car you are braking. If this switch breaks, the dashboard brake light may stay on. The car might not shift out of park properly either. Replacing the switch is usually a quick and cheap fix.
Tools You’ll Need for the Reset
Before you start, gather the right tools. Having everything ready makes the process smooth. You do not need expensive equipment for most resets. Here is what you should have on hand.
- OBD2 Scanner: This is the best tool for reading and clearing codes. A basic Bluetooth scanner works great with a phone app.
- Car Jack and Jack Stands: Needed if you must remove a wheel to check pads or fluid lines.
- Basic Socket Set: For removing the wheel or accessing the brake fluid reservoir.
- Brake Cleaner Spray: Helps clean sensor tips and connectors.
- Gloves and Safety Glasses: Brake fluid can irritate skin and paint. Protect yourself.
If you do not own an OBD2 scanner, you can still try a manual reset. The Honda Civic has a hidden reset procedure for minor glitches. We will cover both methods in the next section.
Step-by-Step Guide to Reset the Brake Light
Now that you know the tools, let us walk through the reset process. Follow these steps carefully. If the light returns after a reset, there is an underlying issue you must fix first.
Using an OBD2 Scanner to Reset
An OBD2 scanner is the most reliable way to clear a brake warning light. Plug the scanner into the port under your dashboard. The port is usually near the steering column. Turn the ignition to the On position without starting the engine. The scanner will read the trouble codes stored in the car’s computer. Write down the codes so you can look them up later. Once you have fixed the root problem, select the option to clear the codes. The brake light should turn off immediately. If you are curious about how long the system takes to recheck everything, read our article on How Long After You Clear Codes To Pass Emissions. The same timeline applies to brake system readiness monitors.
Manual Reset Method for Honda Civic
Some Honda Civic models allow a manual reset without a scanner. This works best when the light came on due to a minor sensor glitch. Start by turning the ignition off. Press and hold the trip reset button on the dashboard cluster. While holding the button, turn the ignition to the On position. Keep holding the button for about ten seconds. The dashboard lights will flash. Release the button. The brake warning light should now be off. If it stays on, the scanner method is your next step.
Checking and Cleaning the Brake Pad Sensor
A dirty brake pad wear sensor can cause a false light. The sensor sits near the inner brake pad. Over time, rust and brake dust build up on the tip. Use brake cleaner spray and a soft cloth to clean the sensor. Make sure the tip is free of any debris. After cleaning, the light may reset on its own. If not, you can clear it with the OBD2 scanner. This simple fix saves a lot of money and time.
Inspecting the Brake Fluid Reservoir
Open the hood and locate the brake fluid reservoir. It is usually on the driver’s side near the back of the engine bay. Check the fluid level against the MIN and MAX marks. If the level is low, top it off with the correct DOT fluid for your Honda Civic. Never mix different types of brake fluid. After topping up, the light might go off. If it does not, you may have a leak that needs further inspection. If you had to remove a wheel to check for leaks, remember to properly put the hubcap back on. You can review how to take a hubcap off and reinstall it safely.
When to See a Professional Mechanic
DIY resets work great for simple issues. But some brake problems are not safe to ignore. You should visit a professional mechanic if you notice any of these signs. Your safety depends on a fully working brake system.
- The light returns immediately after reset: This means the root problem is still there. A scanner will show the exact code.
- The ABS light is on too: A combined ABS and brake warning suggests a serious fault in the ABS module or wheel sensors.
- You see a brake fluid leak: Puddles under the car near the wheels are a major red flag. Brake fluid leaks can lead to complete brake failure.
- The brake pedal feels soft or goes to the floor: This often means air in the lines or a failing master cylinder.
- Grinding noises when braking: Metal-on-metal grinding means the pads are completely worn. You risk damaging the brake rotors.
A trained mechanic has the tools and knowledge to diagnose these issues safely. They can also perform a full brake bleed if needed. Do not drive a car with a persistent brake warning if the pedal feels abnormal.
Preventing the Brake Light from Coming Back
Once you have reset the light and fixed the cause, you want to keep it off. Regular maintenance is the best way to prevent future warnings. A few simple habits will protect your Honda Civic’s brake system for years.
Stick to a Regular Maintenance Schedule
Follow the maintenance schedule in your Honda Civic owner’s manual. The book tells you when to check brake pads, fluid, and sensors. Sticking to this schedule catches small problems before they turn into warning lights. Most Honda Civics need a brake inspection every 15,000 to 30,000 miles.
Check Brake Fluid Monthly
Brake fluid absorbs moisture over time. This lowers its boiling point and can trigger the warning light. Make a habit of checking the reservoir once a month. Top it off if needed. If the fluid is consistently low, look for a leak around the calipers or rubber hoses.
Replace Pads Before They Wear Out Completely
Do not wait for the wear sensor to scream at you. Replace brake pads when they reach about 3 millimeters of thickness. This prevents damage to the rotors and keeps the sensor from triggering. Regular pad replacement is a small cost that saves you from bigger repairs.
Drive Smoothly to Reduce Brake Wear
Hard braking wears pads faster and heats up the fluid. Try to coast to stops when possible. This gentle driving style reduces stress on the entire brake system. It also helps the brake fluid last longer between flushes.
Quick Tips and Common Mistakes
Here are some fast tips and mistakes to avoid. These will save you time and frustration when dealing with the brake system light.
Quick Tips
- Always turn the ignition off before plugging in an OBD2 scanner.
- Use dielectric grease on sensor connectors to prevent corrosion.
- Keep a small bottle of brake fluid in your trunk for emergencies.
- Take a photo of the dashboard lights before you reset them. This helps if the problem returns.
- Check the parking brake switch adjustment if the light flickers on and off.
Common Mistakes to Avoid
- Ignoring the light and just resetting it: This is the biggest mistake. The light is telling you something is wrong. Clearing it without fixing the cause is dangerous.
- Using the wrong type of brake fluid: DOT 3, DOT 4, and DOT 5.1 are not interchangeable. Check your owner’s manual for the correct spec.
- Over-tightening the sensor connector: This can crack the plastic housing and cause a new leak.
- Topping off fluid without checking for leaks: Low fluid usually means a leak or worn pads. Just adding fluid hides the real problem.
- Trying to reset the light while driving: Always do the reset with the car parked and the ignition in the On position.
Final Thoughts on Resetting Your Honda Civic Brake Light
Dealing with a brake system light can feel overwhelming. But most of the time, the fix is straightforward. You now know how to reset the brake system light on a Honda Civic using both a scanner and a manual method. You understand the common causes, from worn pads to low fluid. You also know when to call in a professional. The key is to never ignore the warning. A quick reset feels great, but a permanent fix keeps you safe on the road. Take care of your Honda Civic’s brakes, and they will take care of you for miles to come.
Frequently Asked Questions
Can I drive my Honda Civic with the brake system light on?
You should avoid driving if the light is on and the pedal feels soft or goes to the floor. If the light is just a minor sensor glitch and the brakes feel normal, you can drive carefully to a repair shop. Always treat a brake warning with caution.
How much does it cost to reset a brake light at a shop?
Many shops will read and clear codes for free or a small fee, usually under $50. If the reset is just a simple code clear, you can do it yourself with an OBD2 scanner for under $30.
Will the brake light come back after I reset it?
Yes, if the underlying problem is not fixed. The car’s computer will detect the issue again and turn the light back on. Always repair the root cause before clearing the code.
How do I know if my brake pads need replacing?
Listen for a high-pitched squeal when braking. You can also inspect the pads through the wheel spokes. If the pad material looks thin, like less than 3 millimeters, it is time for new pads.
What is the difference between the brake light and the ABS light?
The brake light warns about the general braking system, such as low fluid or worn pads. The ABS light specifically points to the anti-lock braking system. Both can come on together if there is a serious fault.
Can low brake fluid cause the brake system light to come on?
Yes, low brake fluid is one of the most common reasons for this warning. Check the reservoir level and top it off with the correct DOT fluid. If the level drops again quickly, you likely have a leak that needs professional attention.