Custom Sportster 1200 Build Guide Everything You Need
The Custom Sportster 1200 Build Guide covers everything from planning and engine upgrades to final assembly. Whether you want a bobber, café racer, or chopper, this guide walks you through each step with practical advice and real-world examples. You will learn how to choose the right parts, avoid costly mistakes, and create a ride that truly reflects your style.
Building a Custom Sportster 1200 Build Guide project is one of the most rewarding things you can do as a motorcycle enthusiast. The Harley-Davidson Sportster 1200 has been a favorite among riders for decades. Its compact engine, classic looks, and customizable platform make it the perfect starting point for a personal build. Whether you dream of a stripped-down bobber, a sleek café racer, or a raw chopper, the Sportster 1200 can handle it all.
This guide walks you through every step of the process. From initial planning and engine selection to final assembly and that first glorious ride, you will find everything you need right here. I will share practical tips, real-world examples, and lessons learned from years of custom motorcycle building. By the end, you will feel confident enough to start your own custom Sportster 1200 project with a clear roadmap in hand.
Custom motorcycle building is not just about parts and bolts. It is about creating something that represents you. Every decision you make, from the style of the handlebars to the color of the paint, tells a story. A Sportster 1200 custom build lets you tell your story on two wheels. So let us dive in and get started.
Key Takeaways
- Start with a solid plan: Defining your build style and budget upfront saves time and money throughout the project.
- Engine upgrades make or break the ride: Choosing the right camshaft, exhaust, and intake transforms your Sportster 1200 performance.
- Chassis work is just as important as engine work: Proper suspension and handling upgrades make your custom bike safe and fun to ride.
- Body and paint give your bike personality: Custom paint, seat mods, and bodywork turn a stock Sportster into a head-turner.
- Avoid common beginner mistakes: Rushing the build, skipping research, and ignoring fitment cause the most problems.
- Take your time with final assembly: Proper torque specs, cable routing, and pre-ride checks ensure a smooth first ride.
📑 Table of Contents
Why Build a Custom Sportster 1200
The Harley-Davidson Sportster 1200 has earned its place as one of the most popular platforms for custom builds. But why do so many riders choose this bike as their canvas? There are several great reasons.
First, the Sportster 1200 engine is simple and well-understood. The air-cooled V-twin is forgiving for beginners yet capable of serious performance gains. You do not need a degree in engineering to work on it. Second, the aftermarket parts market for Sportsters is massive. You can find everything from simple bolt-on upgrades to full custom frames and swingarms. Third, the stock Sportster 1200 is lightweight and nimble compared to larger Harley models. This makes it fun to ride and easier to work on in your garage.
Custom builds also let you escape the cookie-cutter look of factory bikes. When you build your own custom Harley Sportster 1200, every single part reflects your taste. You decide the style, the sound, the ergonomics, and the overall vibe. No one else on the road will have the exact same bike. That personal connection is what makes custom building so addictive.
Popular Custom Styles for the Sportster 1200
Before you start ordering parts, it helps to know what style you want. Here are the most popular directions riders take with a Sportster 1200 build:
- Bobber: A stripped-down, minimalist bike with a shortened rear fender, solo seat, and clean lines. Bobbers focus on simplicity and raw function.
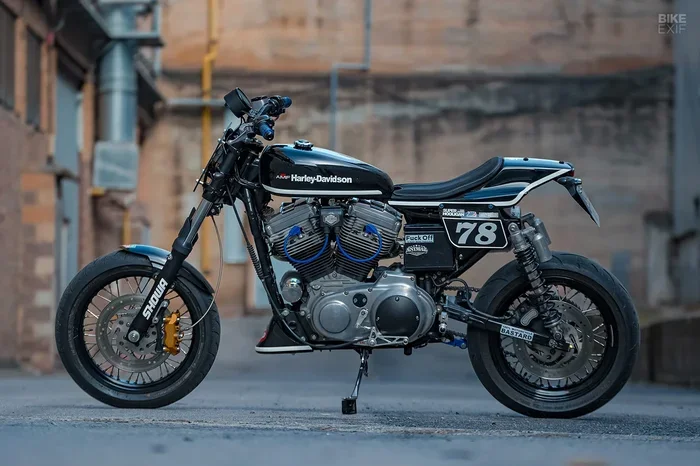
- Café Racer: Inspired by 1960s British racing culture. Café racers feature clip-on handlebars, a rear cowl, and a forward-leaning riding position.
- Chopper: Long front end, raked forks, and a laid-back stance. Choppers make a bold visual statement and turn heads everywhere.
- Brat Style: A mix of bobber and café racer. Brat-style builds use a flat seat, minimal fenders, and a clean, practical look.
- Scrambler: A dual-sport-inspired build with high-mounted exhaust, spoked wheels, and a rugged, adventurous feel.
Each style requires different parts and approaches. Knowing your target style early helps you plan your budget and avoid buying unnecessary components.
Planning Your Custom Sportster 1200 Build
Planning is the most overlooked step in any custom motorcycle build. Many riders jump straight into buying parts and end up with a pile of components that do not fit together. A solid plan saves you time, money, and frustration.
Start by setting a realistic budget. Custom builds almost always cost more than expected. A good rule of thumb is to add 20 percent to your initial estimate for surprises. Next, decide which parts you need to buy new versus used. Online forums, salvage yards, and Facebook Marketplace are goldmines for used Sportster 1200 parts at a fraction of retail price.
Create a parts list and prioritize it. Group your needs into three categories: essentials, performance upgrades, and cosmetic touches. Essentials include things like a new exhaust, grips, and mirrors. Performance upgrades might mean a new camshaft or air filter. Cosmetic touches cover paint, badges, and decorative elements. Tackling the essentials first ensures your bike runs well before you focus on looks.
Research and Inspiration
Spend time browsing build galleries online. Sites like Pinterest, Instagram, and custom motorcycle forums are full of inspiration. Save images of builds you like and note what specific elements appeal to you. Do you love the exhaust on one bike? The seat on another? Building a mood board helps you visualize your final result before you spend a dime.
Also, read build journals from other Sportster owners. These first-hand accounts are incredibly valuable. You will learn what parts work well together, what fits without modification, and what common pitfalls to watch for. The Sportster custom build community is generous with advice, so do not hesitate to ask questions.
Tools You Will Need
Having the right tools makes any build easier and safer. Here is a basic list for a Sportster 1200 custom build:
- Socket set (metric and standard)
- Torque wrench
- Breaker bar
- Engine stand
- Welder (for frame and chassis work)
- Angle grinder with cutting and grinding discs
- Wire crimping tools
- Oil drain pan and funnel
- Service manual for your specific year
You do not need every fancy tool on the market. Start with the basics and add specialty tools as your build demands them. A good service manual for your specific Sportster model year is essential. It contains torque specs, wiring diagrams, and assembly instructions that keep you from guessing.
Engine and Performance Upgrades
The heart of any custom build is the engine. The Sportster 1200 comes with a 1200cc Evolution engine that produces around 60 to 70 horsepower stock. That is plenty for cruising, but if you want more punch, there are many upgrades available.
One of the easiest and most impactful upgrades is a high-flow air filter. A performance air filter allows more air into the engine, which improves combustion efficiency. Combined with a free-flowing exhaust, you will notice a noticeable boost in throttle response and sound. Many riders start here because it is simple to install and does not require engine disassembly.
Next, consider your camshaft selection. The camshaft controls valve timing and directly affects how your engine feels at different RPM ranges. A mild camshaft gives you a smoother idle and better low-end torque, which is great for street riding. A hot camshaft opens the valves longer and more aggressively, giving you more top-end power but a rougher idle at low speeds.
Exhaust System Choices
The exhaust is one of the most visible and audible upgrades on any custom build. For a custom Sportster 1200, you have several options:
- Slash-cut pipes: Classic and simple. They offer a good balance of sound and performance.
- Peashooter pipes: Small-diameter pipes that give a sharp, aggressive sound. Popular on bobbers and choppers.
- Expansion chamber exhausts: Tuned for maximum performance. These require more installation effort but deliver the best results.
- Custom-built exhaust: For the ultimate personal touch, have a custom exhaust fabricated to match your bike’s style.
Remember that exhaust choices also affect the bike’s weight. A lightweight exhaust system helps keep your custom build nimble and fun to ride.
Fuel and Ignition Tuning
When you add performance parts like a new exhaust and air filter, your bike’s fuel mixture needs adjustment. The stock carburetor or fuel injection system is calibrated for stock components. A fuel controller or ECU tune ensures your engine runs correctly with your new parts. Skipping this step can lead to poor fuel economy, rough running, or even engine damage over time.
Many riders also upgrade their ignition system. An aftermarket ignition coil and spark plugs provide a stronger spark, which improves combustion. This is a small change that makes a real difference in how the bike feels, especially at low RPMs.
Chassis, Suspension, and Handling
Performance means nothing if the bike does not handle well. The chassis and suspension are what connect you to the road and keep you safe. Upgrading these components transforms how your custom Sportster 1200 rides.
The stock Sportster suspension is adequate for basic riding, but it leaves a lot to be desired for a custom build. Aftermarket front forks and rear shocks give you adjustable damping, better rebound control, and a more refined ride feel. Look for Sportster 1200 suspension upgrades from reputable brands that offer multiple adjustment options.
Front End Modifications
The front end is one of the first things people notice on a custom build. You can swap the stock forks for longer or shorter units depending on your desired look and ride geometry. Longer forks create a stretched, chopper-like appearance. Shorter forks give a more aggressive, forward-leaning stance.
Triple clamp upgrades also change the look and feel. A triple clamp with a different style or finish adds a custom touch to the front end. Just make sure any fork or clamp changes are compatible with your wheel size and brake system.
Rear Suspension and Swingarm
The rear of the Sportster is where you can really get creative. Many custom builders swap the stock rear shock for a universal swingarm and a pair of adjustable shocks. This allows you to set your ride height precisely and tune the suspension to your weight and riding style.
If you want a more dramatic look, consider a custom springer front end or a girder fork conversion. These vintage-style front ends give your bike a classic, old-school appearance. They require more fabrication skill but deliver stunning results when done right.
Body Work, Paint, and Style
This is where your custom build starts to look like something special. Body work and paint are what make people stop and stare. A great paint job and thoughtful body modifications turn a stock Sportster into a genuine showpiece.
Start with the tank and fenders. Many custom builders replace the stock tank with a slimmer aftermarket unit or modify the original to reduce its profile. A custom Sportster tank with a unique paint design or a classic two-tone finish instantly changes the bike’s character.
Seat Modifications
The seat is a focal point on any custom build. Solo seats are popular for bobbers and café racers. You can buy a pre-made solo seat or have one custom shaped and upholstered to match your bike’s color scheme. For a more rugged look, consider a bench-style seat with leather or vinyl upholstery.
Do not forget about the rear fender. Many custom builds remove the rear fender entirely or use a very short clip-on version. If you keep a fender, consider having it custom shaped from stainless steel or aluminum for a clean, tailored look.
Paint and Finish
Paint is the final statement of your build. You have two main options: do it yourself or hire a professional. A professional paint job looks incredible but can cost anywhere from $1,500 to $5,000 or more depending on complexity. A DIY paint job is much cheaper but requires patience, skill, and the right equipment.
If you paint it yourself, start with proper surface preparation. Sand the tank down to bare metal, apply primer in thin coats, and sand between each coat. Use high-quality automotive paint and clear coat for durability. Practice on scrap metal first if you are new to painting. A clean, solid color with a smooth finish always looks better than a complex design done poorly.
For those who want something truly unique, consider custom airbrush art or a metal flake finish. These techniques add depth and visual interest that sets your bike apart from every other Sportster on the road.
Common Mistakes to Avoid
Every custom builder, no matter how experienced, has made mistakes along the way. Learning from others’ errors saves you time and money. Here are the most common mistakes to watch out for during your Custom Sportster 1200 Build Guide project.
Skipping the service manual. The factory service manual contains critical information about torque specs, wiring colors, and assembly sequences. Ignoring it can lead to broken bolts, electrical gremlins, and unsafe setups. Always consult your manual before disassembling or installing anything.
Buying parts before planning. It is tempting to order shiny new parts the moment you find them. But without a plan, you risk buying parts that do not fit or clash with other components. Plan your build first, then shop with a list.
Ignoring fitment and clearances. A part might look great on another bike but not fit yours. Always check dimensions, mounting points, and clearance before purchasing. A custom exhaust that rubs against the swingarm or a handlebar that hits the tank will cause problems you do not want.
Overbuilding on a budget bike. It is easy to fall into the trap of spending more on parts than the bike is worth. Set a budget and stick to it. You can always upgrade later. A well-executed modest build looks and rides better than a half-finished over-budget project.
Neglecting electrical work. Aftermarket lights, indicators, and wiring harnesses are common upgrades. But poor electrical work causes more problems than any other aspect of custom builds. Use quality connectors, protect your wiring with loom, and test everything thoroughly before your first ride.
Final Assembly and First Ride
Once all your parts are gathered and your body work is complete, it is time for final assembly. This is the exciting part where everything starts to come together. Take your time and follow your service manual for torque specifications and assembly sequences.
Start with the engine and transmission. Mount the engine to the frame using a proper engine stand for safety. Connect the clutch cable, throttle cable, and shift linkage. Double-check every bolt torque before moving on. Next, install the exhaust system, making sure all clamps are tight and there are no exhaust leaks.
After the engine, work on the wheels, brakes, and final drive. Install your tires, bleed the brake lines, and check that the chain or belt tension is correct. Route all cables neatly and secure them with zip ties or cable housing clips. Loose cables rattle, snag, and look messy.
Before your first ride, do a thorough pre-ride inspection. Check all fluid levels, tire pressure, brake function, and light operation. Start the engine and let it warm up while watching for any leaks or unusual sounds. Take it slow on your first ride and listen to how the bike feels. Every custom bike has its own personality, and the first ride is when you start to learn yours.
Post-Ride Adjustments
After your first few rides, you will notice things you want to adjust. Maybe the handlebars feel too low or the seat is uncomfortable for long rides. Custom building is an ongoing process. You will continue to tweak and refine your bike long after the initial assembly is complete. Embrace this process. It is part of what makes custom motorcycle building so enjoyable and rewarding.
Conclusion
Building a Custom Sportster 1200 Build Guide project is one of the most fulfilling experiences a motorcycle rider can have. From choosing your build style and selecting the right parts to painting, assembling, and finally riding your creation, every step brings you closer to something truly personal. The Sportster 1200 platform offers the perfect balance of simplicity, performance, and style to make your vision a reality.
Remember to plan carefully, invest in quality parts, and never skip the planning phase. Avoid the common mistakes that trip up so many builders, and take pride in every detail. Your custom Sportster is more than just a motorcycle. It is a reflection of your creativity, your passion, and your personality. Now go build something amazing.
Frequently Asked Questions
What year Sportster 1200 is best for a custom build?
Most Sportster 1200 models from 2004 onward work great for custom builds because they have the more reliable fuel-injected engine. Earlier models with carburetors are also popular and offer a simpler platform for modifications. Choose a model that fits your budget and parts availability in your area.
How much does it cost to build a custom Sportster 1200?
The cost varies widely depending on the level of customization. A basic build with bolt-on parts can cost anywhere from $2,000 to $5,000. A more extensive build with engine upgrades, custom suspension, and professional paint can range from $5,000 to $15,000 or more. Always budget an extra 20 percent for unexpected expenses.
Do I need welding skills for a Sportster 1200 custom build?
Not necessarily. Many bolt-on custom parts require no welding at all. However, if you want to modify the frame, fabricate a custom exhaust, or install a springer fork, welding skills become very helpful. You can always hire a welder for specific tasks if you prefer to focus on other aspects of the build.
Can I build a Sportster 1200 as a beginner?
Absolutely. The Sportster 1200 is one of the most beginner-friendly platforms for custom building. Its simple engine design and abundant aftermarket parts make it approachable for riders with basic mechanical skills. Start with simpler upgrades and gradually take on more complex modifications as your confidence grows.
How long does a custom Sportster 1200 build take?
Build time depends on your experience level and the complexity of the project. A straightforward bolt-on custom can be completed in a few weekends. A more involved build with engine work, body modifications, and custom paint might take several months. The key is to enjoy the process and not rush the result.
What is the best way to find used Sportster parts for my build?
Online forums dedicated to Harley-Davidson enthusiasts, Facebook Marketplace, Craigslist, and local salvage yards are excellent sources for used parts. Join Sportster-specific forums where members often sell or trade parts. Always inspect used parts for cracks, corrosion, and wear before purchasing.
=== SEO TITLE ===
Custom Sportster 1200 Build Guide Everything You Need
=== META TITLE ===
Custom Sportster 1200 Build Guide | Everything You Need
=== URL SLUG ===
custom-sportster-1200-build-guide