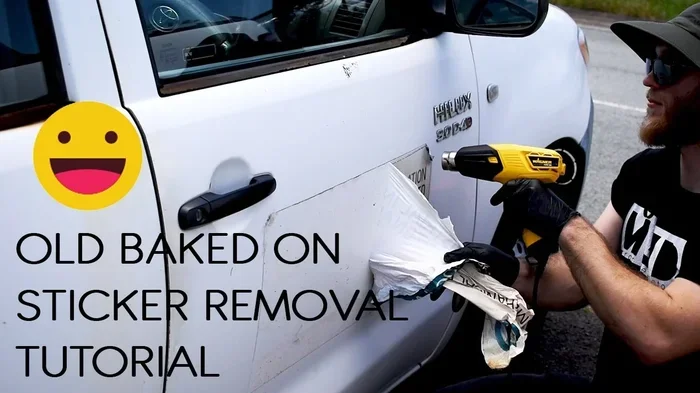
Best Adhesive Remover for Cars to Get Rid of Stickers
The best adhesive remover for cars makes sticker removal quick, safe, and easy. Whether you are dealing with old bumper stickers or new decals, the right product protects your paint while dissolving tough glue. In this guide, we review the top-rated adhesive removers, share proven removal steps, and highlight the common mistakes you should avoid.
Every car owner has been there. You spot an old bumper sticker on your trunk or a stubborn decal on your side panel. No matter how long it has been there, you want it gone. The problem is that sticker residue can be incredibly tough to remove. Regular soap and water will not cut through automotive adhesive. That is where a quality adhesive remover for cars comes in.
Removing stickers from a car is not just about aesthetics. Old decals can trap moisture against the paint. They can also hide rust or damage underneath. More importantly, using the wrong removal method can damage your clear coat. This is why choosing the right adhesive remover for cars matters so much.
In this complete guide, we will cover everything you need to know. We will look at the best products available, the safest removal techniques, and the mistakes that cause most people harm. Whether you are a car detailing enthusiast or just someone who wants a clean vehicle, this guide has you covered.
Key Takeaways
- Use a dedicated adhesive remover for cars: Regular household cleaners often fail to dissolve sticker glue without risking paint damage.
- Always test on a hidden area first: Even paint-safe products can react differently depending on your car’s clear coat.
- Apply heat before using any remover: A heat gun or hairdryer softens the adhesive, making removal much easier.
- Avoid harsh scraping tools: Use a plastic scraper instead of metal to prevent scratches and swirl marks.
- Wax your car after removal: Restoring the protective layer keeps your paint safe from future adhesive buildup.
- Choose residue-free formulas: The best adhesive remover for cars leaves no sticky film behind.
- Act quickly on fresh stickers: Newer decals are always easier to remove than ones that have been on the car for years.
📑 Table of Contents
- Why You Need an Adhesive Remover for Cars
- How to Choose the Best Adhesive Remover for Cars
- Top Adhesive Removers for Car Stickers Reviewed
- Step-by-Step Guide to Removing Stickers from Your Car
- Common Mistakes to Avoid When Removing Car Stickers
- Keeping Your Car Sticker-Free and Looking Great
- Final Thoughts on Using Adhesive Remover for Cars
Why You Need an Adhesive Remover for Cars
What Happens When Stickers Stay on Too Long
Stickers do not just sit on top of your paint. Over time, the adhesive bonds with the clear coat. Sunlight, heat, and weather all make this bond stronger. What starts as a simple bumper sticker removal job can turn into a real challenge after a few years. The glue hardens. It seeps into microscopic pores in the paint surface.
Old stickers also leave behind what professionals call sticker ghost marks. These are discolored patches where the adhesive reacted with the paint. In some cases, the paint itself may fade or change texture. This is why you should never let a sticker sit on your car for years without addressing it.
Using the right adhesive remover for cars prevents this damage. A quality product dissolves the glue without attacking the paint underneath. It breaks the bond between the adhesive and the clear coat safely and effectively.
Why Regular Cleaners Do Not Work
You might be tempted to use household cleaners like dish soap or all-purpose spray. These products are great for everyday dirt and grime. But they are not designed to break down automotive adhesive. The chemical composition of sticker glue is very different from regular dirt. It needs a specialized adhesive dissolver to break the bond.
Some people try using rubbing alcohol or acetone. While these can work, they also strip away wax and sealant. They can dry out plastic trim and even damage certain paint finishes. A dedicated car decal cleaner is formulated to target adhesive without harming other surfaces.
This is the key difference. A regular cleaner lifts dirt. An adhesive remover for cars dissolves the molecular bond between glue and paint. That is why investing in the right product saves you time, effort, and potentially expensive paint repairs.
How to Choose the Best Adhesive Remover for Cars
Look for Paint-Safe Formulas
The most important factor in choosing an adhesive remover for cars is paint safety. You want a product that dissolves glue without dissolving your paint. Look for formulas that are specifically labeled as paint-safe adhesive remover or safe for automotive use.
Many premium products include conditioning agents that protect the paint during the removal process. These products often leave a thin protective layer behind. This helps prevent oxidation and keeps your paint looking fresh.
Always check the label for warnings about clear coats and tinted windows. Some adhesive remover for cars products are safe for paint but not for glass or plastic. Knowing this before you start saves you from unexpected damage.
Consider the Type of Adhesive
Not all sticker adhesives are the same. Some are water-based. Others are solvent-based. Some are designed for outdoor use and resist rain and UV rays. The type of adhesive determines which adhesive remover for cars will work best.
For standard vinyl decals and bumper stickers, most automotive adhesive cleaners work well. For heavy-duty industrial adhesives or rubber-based decals, you may need a stronger formula. Products like Goo Gone or WD-40 are versatile enough to handle most adhesive types found on cars.
If you are dealing with a residue-free removal, look for products specifically marketed as leaving no behind. These car decal cleaners are formulated to evaporate cleanly after dissolving the adhesive.
Check for Residue-Free Results
One of the biggest frustrations with sticker removal is the sticky film left behind. Even after you peel off the sticker, the residue remains. This is where a quality adhesive remover for cars earns its keep. The best products dissolve the residue completely, leaving the surface clean and smooth.
Look for products that advertise residue-free cleaning. Read reviews from other car owners. Real-world feedback tells you a lot about how well a product actually performs. Some glue remover for car products claim to work but leave an oily film that attracts dust.
A good adhesive remover for cars should leave your paint feeling smooth to the touch. If it feels sticky or tacky after application, rinse thoroughly with water and mild soap. Then apply a coat of wax to restore protection.
Expert Insights: What Professional Detailers Recommend
Professional detailers agree that the best approach combines heat, a quality adhesive remover for cars, and a plastic scraping tool. They also recommend working in small sections rather than tackling a large sticker all at once. This keeps the product active and prevents it from drying before you can wipe it away.
Most experts suggest choosing a citrus-based solvent for everyday sticker jobs. Citrus-based formulas are effective yet gentle on paint and clear coat. For heavy-duty tasks, a solvent-based product from a trusted brand like 3M delivers stronger results. The key is matching the product strength to the job at hand.
Detailers also emphasize the importance of follow-up care. After removing any sticker, always wash the area and apply a fresh layer of wax. This restores the protective barrier and keeps your paint in top condition.
Top Adhesive Removers for Car Stickers Reviewed
Goo Gone Original Automotive Formula
Goo Gone is one of the most well-known names in adhesive removal. Their automotive-specific formula is designed to dissolve sticker glue, tape residue, and adhesive marks without harming car paint. It is a citrus-based solvent, which means it is effective but relatively gentle.
Users love that Goo Gone leaves a light citrus scent and does not produce harsh fumes. It works well on both fresh and old stickers. The spray bottle makes application easy and controlled. You simply spray it on, let it sit for a minute, and wipe away the residue.
The downside is that Goo Gone can leave a slight oily residue if not wiped off properly. Always follow up with a wash and wax after using this product.
3M Adhesive Residue Remover
3M is a trusted name in automotive care. Their adhesive residue remover is a professional-grade product used by detailers worldwide. It is designed specifically for removing adhesive from painted surfaces, glass, and plastic trim.
This product is a solvent-based formula that quickly breaks down even the toughest adhesive bonds. It works well on old bumper stickers and industrial decals. The applicator pad included with the product makes it easy to apply without overspray.
One thing to note: 3M’s remover is stronger than citrus-based options. It should be used with care on sensitive surfaces. Always test on a hidden area first and follow the instructions on the label.
WD-40 Specialist Adhesive Remover
WD-40 is famous for its penetrating oil, but their specialist adhesive remover is a different product entirely. It is formulated to dissolve adhesive without the messy oil residue associated with standard WD-40.
This product works well on car stickers, decal residue, and tape marks. It sprays on cleanly and wipes off easily. Many car owners keep a can in their garage specifically for sticker removal tasks.
The main advantage of the WD-40 Specialist formula is its versatility. It also works on rust removal and chain lubrication, making it a useful all-around automotive product. However, it may require a second application on very old or stubborn stickers.
Chemical Guys Velvety Smooth Interior Detailer
Chemical Guys offers a detailer that doubles as a mild adhesive solvent for light sticker residue. While not a dedicated adhesive remover, it works well on fresh decals and minor residue. It is a popular choice among car detailing enthusiasts who prefer a gentler approach.
This product is ideal for quick touch-ups and maintenance. It is not strong enough for decade-old bumper stickers, but for regular upkeep, it gets the job done without risking paint damage.
Comparison Table
| Product | Type | Best For | Paint Safe | Residue-Free |
|---|---|---|---|---|
| Goo Gone Original | Citrus-based solvent | Fresh and old stickers | Yes | With proper wiping |
| 3M Adhesive Residue Remover | Solvent-based | Heavy-duty adhesive | Yes | Yes |
| WD-40 Specialist | Solvent-based | Moderate adhesive | Yes | With proper wiping |
| Chemical Guys Detailer | Mild solvent | Light residue and touch-ups | Yes | Yes |
Step-by-Step Guide to Removing Stickers from Your Car
Follow these steps carefully for the best results. Each step builds on the one before it. Skipping steps can lead to leftover residue or paint damage.
Step 1: Clean the Area Thoroughly
Before you apply any adhesive remover for cars, start with a clean surface. Wash the area around the sticker with car wash soap and water. This removes loose dirt and debris that could scratch the paint during the removal process.
Dry the area completely with a clean microfiber cloth. A dry surface allows the adhesive remover to work more effectively. It also helps you see exactly where the sticker ends and where the residue begins.
Step 2: Apply Heat to Soften the Adhesive
Heat is your best friend when removing car stickers. Use a heat gun on a low setting or a standard household hairdryer. Hold it about six inches from the sticker surface and move it in a circular motion.
The heat softens the adhesive, making it more pliable. This allows you to peel the sticker off in one piece rather than breaking it into small, difficult-to-remove pieces. Apply heat for about 30 seconds to one minute before attempting to peel.
Quick Tip: Never use a heat gun on high heat. Excessive heat can damage paint or warp plastic trim. Keep the temperature moderate and move the heat source constantly.
Step 3: Peel the Sticker Carefully
Once the adhesive is warm and soft, start peeling the sticker from one corner. Use your fingernails or a plastic scraper to lift an edge. Pull the sticker back slowly at a 180-degree angle. This reduces the stress on the adhesive and helps it release cleanly from the paint.
If the sticker breaks or tears, do not worry. Apply more heat and continue peeling. You can also spray a small amount of adhesive remover for cars directly onto the remaining sticker to help dissolve the bond while you peel.
Step 4: Apply the Adhesive Remover
Now it is time to tackle the residue. Spray the adhesive remover for cars directly onto the sticky area. Let it sit for the time recommended on the product label. Usually, one to two minutes is enough for most formulas.
Do not let the product dry on the surface. Work in small sections if the sticker covered a large area. This ensures the remover stays active and does not evaporate before you can wipe it away.
For stubborn spots, you can apply a second coat. Let it sit for another minute and then wipe with a microfiber cloth. The residue should come off easily without much scrubbing.
Step 5: Scrape Gently If Needed
For any remaining adhesive, use a plastic scraper or a dedicated adhesive removal tool. Hold the scraper at a low angle and glide it across the surface. The plastic material prevents scratches and swirl marks that metal tools can cause.
Never use a razor blade or metal scraper on car paint. Even with a lot of pressure, these tools can leave permanent marks. A plastic scraper is just as effective and completely safe for your paint.
If the residue is still clinging on, apply more adhesive remover for cars and let it work for a few extra minutes. Patience is key. Rushing this step is one of the most common mistakes people make.
Step 6: Clean and Protect the Surface
Once all the adhesive is gone, wash the area again with car wash soap. This removes any remaining traces of the adhesive remover. Dry the surface with a fresh microfiber cloth.
Now apply a layer of wax or sealant to protect the paint. The adhesive remover for cars may have stripped away some of the existing wax. Reapplying a protective layer restores the shine and shields the paint from future damage.
This final step is often overlooked but is extremely important. A freshly cleaned and waxed surface looks better and stays cleaner longer. It also makes future sticker removal easier if you ever need to do it again.
Common Mistakes to Avoid When Removing Car Stickers
Using Harsh Chemicals
One of the biggest mistakes people make is reaching for whatever strong cleaner they have at home. Acetone, bleach, and abrasive household sprays can damage car paint. These chemicals strip away the clear coat and can cause permanent discoloration.
Always use a product specifically designed as an adhesive remover for cars. These products are tested on automotive surfaces and are formulated to be safe. If you are unsure whether a household product is safe, test it on a hidden area first.
Skipping the Heat Step
Many people try to peel off a sticker cold and then apply the remover to the residue. This approach takes much longer and often leaves more residue behind. Heat softens the adhesive and allows the sticker to release cleanly from the surface.
Skipping the heat step also increases the risk of scratches. When adhesive is cold and rigid, it tends to break into small pieces that require more scraping. More scraping means more risk of paint damage. Always apply heat first.
Scrubbing Too Hard
It is tempting to scrub aggressively when residue will not come off. But aggressive scrubbing can create swirl marks and fine scratches in the paint. These imperfections are visible in sunlight and can be expensive to fix.
Instead, apply more adhesive remover for cars and let it work. Give the product time to dissolve the adhesive. Then wipe gently with a soft cloth. If needed, use a plastic scraper with light pressure. Patience and the right technique always beat brute force.
Using Metal Scrapers or Razor Blades
This mistake deserves its own section because it is so common. People use razor blades, utility knives, or metal scrapers to remove sticker residue. These tools are effective at removing glue, but they also remove paint.
Even professional detailers avoid metal scrapers on painted surfaces. A plastic scraper or a piece of soft plastic (like an old credit card) works just as well for most residue. It is a safer choice that protects your car’s finish.
Not Testing the Product First
Every car has a different type of paint and clear coat. What works safely on one vehicle may cause issues on another. Always test your chosen adhesive remover for cars on a hidden area before applying it to the visible sticker location.
Wait at least five minutes after testing. Check for any discoloration, softening of the paint, or other adverse reactions. If the test area looks fine, you can proceed with confidence on the sticker location.
Keeping Your Car Sticker-Free and Looking Great
Apply a Protective Wax Layer
After removing stickers and adhesive, your car’s paint benefits from a fresh protective layer. A quality car wax creates a barrier between the paint and environmental contaminants. This barrier also makes future sticker removal easier, since adhesive has a harder time bonding to a waxed surface.
Apply a coat of paste wax or synthetic sealant every few months. This is a simple step that pays off in both appearance and protection. A well-waxed car also resists bird droppings, tree sap, and UV damage better than an unwaxed one.
Regular Maintenance Tips
Keeping your car free of adhesive buildup is easier than you think. Follow these simple habits:
- Remove new stickers promptly: Fresh decals are always easier to remove than old ones. Do not let them sit for months or years.
- Use a wax and grease remover regularly: This keeps the paint surface clean and prevents adhesive from bonding strongly.
- Keep a microfiber cloth and small spray bottle of adhesive remover in your garage: Having the right tools ready makes removal a quick job.
- Avoid parking under trees where sap can mix with sticker residue: Tree sap creates an even stronger bond that is harder to remove.
- Use a plastic scraper for quick touch-ups: A small plastic scraper is handy for removing small bits of residue between wax applications.
With the right adhesive remover for cars and a little regular care, your vehicle can stay looking clean and sticker-free all year round. The key is to act quickly, use the right products, and never rush the process.
Final Thoughts on Using Adhesive Remover for Cars
Removing stickers from your car does not have to be a stressful experience. The right adhesive remover for cars turns a difficult task into a simple one. Whether you choose Goo Gone, 3M, WD-40 Specialist, or another trusted brand, the important thing is to follow the proper steps and protect your paint.
Remember to always apply heat first, use a plastic scraper, and finish with a protective wax layer. These steps ensure that your car looks great long after the sticker is gone. The best adhesive remover for cars is the one that works safely and effectively for your specific needs.
Take your time, be patient, and trust the process. With the right adhesive remover for cars in hand, you can say goodbye to stubborn stickers and hello to a clean, beautiful vehicle. Your car deserves to look its best, and now you have all the tools and knowledge to make that happen.
Frequently Asked Questions
Can I use adhesive remover on a car with a clear coat?
Yes, most adhesive remover for cars products are safe for clear-coated paint. However, you should always check the product label and test on a hidden area first. Choose a paint-safe adhesive remover to avoid any risk of damaging the clear coat or causing discoloration.
How long should I let the adhesive remover sit before wiping?
Most adhesive remover for cars products need one to two minutes to work. Check the manufacturer’s instructions for the specific product you are using. For very old or stubborn stickers, you may need to let it sit for up to five minutes. Do not let the product dry completely on the surface.
Will adhesive remover damage my car’s paint?
A quality adhesive remover for cars designed for automotive use will not damage your paint when used correctly. Avoid using harsh household chemicals like acetone or bleach. Always follow the product instructions and wipe off residue thoroughly after use. Applying wax after removal adds an extra layer of protection.
Can I use rubbing alcohol instead of a dedicated adhesive remover?
Rubbing alcohol can work for fresh sticker residue, but it is not ideal for old or heavy adhesive. It can also strip away your car’s wax and sealant. A dedicated adhesive remover for cars is safer and more effective, especially for long-standing stickers and tough adhesive residue.
What is the best way to remove old bumper stickers?
The best approach is to apply heat with a hairdryer or heat gun to soften the adhesive, then peel the sticker slowly. Follow up with a quality adhesive remover for cars to dissolve any remaining residue. Use a plastic scraper for any stubborn spots and finish by washing and waxing the area.
How do I prevent sticker ghost marks from forming?
Remove stickers as soon as possible before the adhesive has time to bond deeply with the paint. Use heat and a proper adhesive remover for cars to dissolve the glue completely. If ghost marks have already formed, a paint-safe adhesive remover combined with light buffing can often reduce their appearance significantly.