How Do You Remove an Engine Maintenance Light Step by Step
Removing an engine maintenance light is simpler than most drivers think. This step-by-step guide walks you through the most effective methods to reset your maintenance reminder, from using your trip meter to an OBD scanner. You will learn the exact process for different vehicle models, common mistakes to avoid, and when to seek professional help.
That little wrench or engine-shaped light on your dashboard can really get under your skin. You have taken care of the oil change, the tire rotation, and every other service item on your list. So why does the maintenance light still stare back at you every time you start the car?
Removing an engine maintenance light is a task most car owners can handle themselves. You do not need to be a mechanic or spend hundreds of dollars at the shop. With the right steps and a bit of patience, you can clear that annoying light in minutes. This guide shows you exactly how to do it, no matter what kind of vehicle you drive.
Before we dive into the steps, let us talk about what this light actually means. The engine maintenance light, sometimes called the service light or maintenance reminder, is part of your car’s onboard diagnostics system. It tracks your mileage and reminds you when it is time for scheduled service. Once you complete the service, the light needs to be manually reset on most vehicles.
Now, here is something important. Sometimes the maintenance light stays on because there is a real problem under the hood. If you recently had service done and the light did not go off, or if the light keeps coming back after you reset it, you should investigate further. Can a check engine light go off by itself? Yes, in some cases, but a persistent maintenance light often signals something that needs attention.
Let us get into the step-by-step methods. Each one works for different situations and vehicle types. I will walk you through them clearly so you can pick the method that fits your car and your comfort level.
Key Takeaways
- Multiple Methods Work: You can reset the maintenance light using your dashboard controls, a trip meter reset, or an OBD diagnostic scanner.
- Know Your Vehicle: Different car brands require different steps to remove the engine maintenance light.
- Address the Root Cause First: Always fix the underlying issue before resetting the light to avoid recurring warnings.
- Simple Tools Help: An OBD scanner makes the process faster and more reliable for most vehicles.
- Common Mistakes Exist: Disconnecting the battery incorrectly or resetting without fixing the problem are frequent errors.
- When to Get Help: If the light keeps coming back, a professional mechanic can run deeper diagnostics.
📑 Table of Contents
- Understanding Your Engine Maintenance Light
- Method 1: Reset Using the Trip Meter
- Method 2: Reset Using the Steering Wheel Controls
- Method 3: Use an OBD Diagnostic Scanner
- Method 4: Disconnect the Battery (Use With Caution)
- Common Mistakes When Removing the Maintenance Light
- When Should You See a Professional?
- How to Prevent the Maintenance Light From Coming Back
- Quick Tips for Different Vehicle Brands
- Final Thoughts on Removing the Engine Maintenance Light
Understanding Your Engine Maintenance Light
What Does the Maintenance Light Look Like?
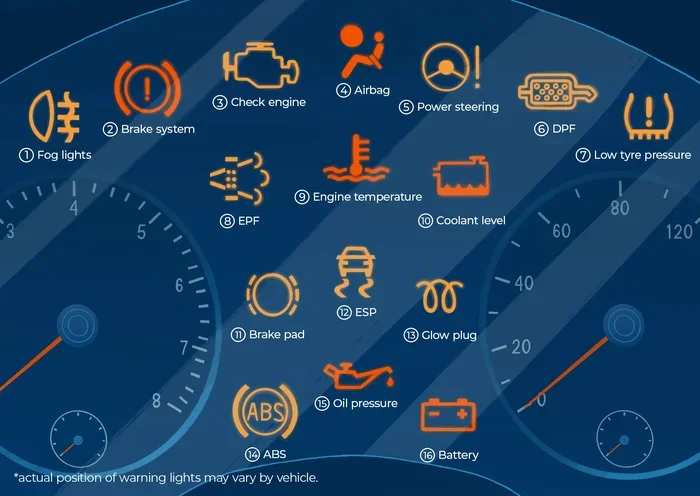
The maintenance light usually looks like a wrench, a service symbol, or sometimes a small engine icon. It appears on your dashboard or instrument cluster. The color varies by vehicle but is most commonly yellow, orange, or amber. Some cars display a text message like “Maintenance Required” or “Service Due.”
Do not confuse the maintenance light with the check engine light. The check engine light is shaped like an engine and usually glows red or yellow. It signals a problem detected by the onboard diagnostics system. The maintenance light is simpler. It is a mileage-based reminder that tells you it is time for routine service like an oil change or tire rotation.
However, the two lights can sometimes overlap. If you run diagnostics without a check engine light present, you may still find stored codes that relate to maintenance intervals. Understanding the difference helps you decide the right approach for resetting your light.
Why Does the Maintenance Light Come On?
The maintenance light comes on based on your vehicle’s service interval. Most cars track mileage and trigger the light every 5,000 to 10,000 miles. Here are the most common reasons the light appears:
- Oil Change Due: Your car has reached the mileage interval for an oil change.
- Scheduled Service Reminder: A routine inspection or service is coming up.
- Reset Not Completed: The light was never reset after the last service.
- System Glitch: A minor electrical issue or sensor hiccup triggered the light.
- Battery Disconnect: Disconnecting the battery can sometimes reset the mileage counter and trigger the light again.
Knowing why the light is on helps you choose the right reset method. If the light came on after a recent oil change, the reset process is straightforward. If the light appeared without any service, you may want to investigate further before simply clearing it.
Method 1: Reset Using the Trip Meter
This is the most common method for older vehicles and many modern cars. It does not require any special tools. You just need access to your dashboard controls and a few minutes of time.
Step-by-Step Instructions
- Turn the ignition to the ON position. Do not start the engine. Just turn the key or press the start button so the dashboard lights up.
- Locate the trip meter reset button. This is usually on the dashboard near the speedometer or on the steering wheel controls.
- Press and hold the reset button. Keep holding it while you move to the next step.
- Turn the ignition to the OFF position. Still holding the button, turn the key back or press the start button to turn the car off.
- Turn the ignition back to ON. Continue holding the reset button for about 10 to 15 seconds.
- Release the button. The maintenance light should blink and then turn off.
- Start the engine. Check if the light is gone. If it is, you are all set.
This method works on many Toyota, Honda, Nissan, and Ford models. The exact button location and hold time can vary. Check your owner’s manual for the specific steps for your vehicle.
Method 2: Reset Using the Steering Wheel Controls
Many newer vehicles use digital displays and steering wheel buttons to manage the maintenance light. This method is common in cars from the last 10 to 15 years.
Step-by-Step Instructions
- Press the MENU or SETUP button on the steering wheel. Navigate to the vehicle settings or maintenance menu on the dashboard display.
- Find the maintenance reset option. This is usually under a “Settings,” “Vehicle,” or “Maintenance” menu.
- Select the service item you want to reset. This could be oil life, inspection, or general maintenance.
- Press and hold the OK or RESET button. Hold it for about 10 seconds until the display shows the reset is complete.
- Turn the ignition off and back on. Start the engine and confirm the maintenance light is off.
This method is very user-friendly. You do not need to open the hood or touch any wires. Just follow the on-screen prompts for your specific make and model.
Method 3: Use an OBD Diagnostic Scanner
An OBD scanner is one of the best tools you can own as a car owner. It plugs directly into your car’s diagnostic port and communicates with the onboard computer. This method works for almost all vehicles made after 1996.
What Is an OBD Scanner?
An OBD scanner, also called an OBD-II scanner, reads and clears diagnostic trouble codes from your car’s computer. It can also reset maintenance lights, check engine lights, and other service reminders. You can buy a basic scanner for under $30, or use one at your local auto parts store for free.
Step-by-Step Instructions
- Locate the OBD port. It is usually under the dashboard on the driver’s side, near the steering column.
- Plug the scanner into the port. Push the connector in firmly until it clicks.
- Turn the ignition to ON. Do not start the engine. The scanner should power on automatically.
- Follow the scanner prompts. Select “Read Codes” to see any stored codes, then select “Clear Codes” or “Reset Maintenance Light.”
- Wait for the scanner to complete the process. This usually takes 10 to 30 seconds.
- Disconnect the scanner. Turn the ignition off, remove the scanner, and start the engine.
- Verify the light is off. Check the dashboard to confirm the maintenance light has been removed.
Using an OBD scanner is the most reliable method. It works across all vehicle brands and gives you the added benefit of reading any hidden codes. If the maintenance light keeps coming back, the scanner will tell you why.
Method 4: Disconnect the Battery (Use With Caution)
Some people suggest disconnecting the battery to reset the maintenance light. While this can work, it comes with risks and should be your last resort. Disconnecting the battery can erase your radio presets, clock settings, and in some cases, adaptive learning data for your transmission and engine.
Step-by-Step Instructions
- Turn off the engine and all accessories. Make sure the car is completely powered down.
- Open the hood and locate the battery. Identify the negative terminal, which is marked with a minus sign.
- Disconnect the negative cable first. Use a wrench to loosen the nut and remove the cable from the terminal.
- Wait for 10 to 15 minutes. This allows the car’s electrical system to fully discharge.
- Reconnect the negative cable. Place it back on the terminal and tighten the nut securely.
- Start the engine. The maintenance light should be off. Check all your settings to make sure nothing was erased.
This method is not recommended for modern vehicles with complex computer systems. If you disconnect the battery, you may need to re-enter radio codes or re-learn certain driving behaviors. Always try the other methods first.
Common Mistakes When Removing the Maintenance Light
Even though resetting the maintenance light is simple, people make mistakes that cause problems. Here are the most common ones to avoid:
- Resetting Without Fixing the Problem: If the light came on because of a real maintenance need, resetting it without addressing the issue just delays the inevitable. Your car still needs service.
- Disconnecting the Wrong Battery Terminal: Always disconnect the negative terminal first. Disconnecting the positive terminal can cause electrical shorts.
- Not Holding Buttons Long Enough: Many people release the reset button too early. Hold it for the full 10 to 15 seconds for the reset to register.
- Ignoring Recurring Lights: If the maintenance light keeps coming back after you reset it, there is an underlying issue. Do not just keep resetting it. Do mechanics check transmission fluid during an oil change? Yes, they do, and a professional can also check why your maintenance light persists.
- Using the Wrong Reset Method: Not all cars use the same reset procedure. Using the wrong method for your vehicle will not work and may cause confusion.
When Should You See a Professional?
There are times when removing the maintenance light is not a DIY job. If you have tried all the methods above and the light keeps coming back, it is time to see a professional. Here are the signs that you need expert help:
- The Light Returns Immediately: If the maintenance light comes back on right after you reset it, there may be a deeper issue with your car’s computer or sensors.
- Multiple Lights Are On: If the maintenance light is accompanied by other warning lights, your vehicle may have a more serious problem.
- You Cannot Find the Reset Procedure: Some newer vehicles have complex reset processes that require a dealer-level scanner.
- You Are Uncomfortable Working Under the Hood: There is no shame in visiting a mechanic. A professional can reset the light and inspect your vehicle at the same time.
A trusted mechanic will have professional-grade diagnostic tools that can read all your vehicle’s systems. They can also perform the actual maintenance your car needs, which is the real reason the light came on in the first place.
How to Prevent the Maintenance Light From Coming Back
Once you have successfully removed the maintenance light, you want to keep it off. Here are simple tips to prevent it from returning prematurely:
- Keep Track of Your Mileage: Use a phone app or a notebook to log your mileage between services. This helps you know when the next service is due.
- Reset the Light Immediately After Service: Always reset the maintenance light right after your oil change or other scheduled service.
- Follow the Manufacturer’s Service Schedule: Every vehicle has a recommended service interval. Sticking to it keeps your car running smoothly and prevents unnecessary warning lights.
- Check for Software Updates: Some newer vehicles need software updates to keep the maintenance system accurate. Ask your dealer about updates during regular visits.
- Use Quality Parts and Fluids: Cheap or incorrect fluids and parts can trigger maintenance alerts. Always use the recommended products for your vehicle.
Taking these simple steps means fewer surprises and a car that stays in great shape. The maintenance light is your friend, not your enemy. It is just trying to remind you to take care of your vehicle at the right time.
Quick Tips for Different Vehicle Brands
Every car brand has its own quirks when it comes to resetting the maintenance light. Here are some quick tips for popular brands:
- Toyota: Use the trip meter reset method. Hold the trip reset button while turning the ignition to ON and then OFF, then back to ON for 10 seconds.
- Honda: Navigate to the maintenance menu using the steering wheel buttons and select “Maintenance Reset.”
- Ford: Use the steering wheel controls to access the vehicle information menu and find the reset option for the service indicator.
- Chevrolet: The trip meter reset method works for most models. Press and hold the trip button while cycling the ignition.
- Nissan: Use the steering wheel controls or the trip meter method depending on your model year.
These are general guidelines. Always refer to your specific owner’s manual for the exact procedure. Vehicle models within the same brand can have different reset processes, especially between older and newer versions.
Final Thoughts on Removing the Engine Maintenance Light
Removing an engine maintenance light is one of those simple car tasks that saves you time and money. Whether you use the trip meter method, the steering wheel controls, an OBD scanner, or the battery disconnect method, the process is straightforward. The key is to reset the light only after you have completed the necessary service.
Remember, the maintenance light is a helpful reminder. It keeps you on track with your vehicle’s care schedule. Reset it with confidence once the service is done, and enjoy the peace of mind that comes with a clean dashboard.
If you run into any trouble, do not hesitate to reach out to a professional. A quick visit to a trusted mechanic can solve any persistent issues and get your car back in top shape. Taking care of your vehicle, including knowing how to manage your maintenance light, is one of the best things you can do as a car owner.
Now you have everything you need to remove that engine maintenance light for good. Grab your tools or your owner’s manual, pick the right method for your car, and get it done. Your dashboard will thank you.
Frequently Asked Questions
Can I drive my car with the maintenance light on?
Yes, you can generally drive with the maintenance light on. It is a reminder for scheduled service, not an immediate danger signal. However, you should not ignore it for too long. Continuing to drive without the recommended service can lead to wear and tear on your engine and other components over time.
How long does it take to reset the maintenance light?
The reset process usually takes less than five minutes. Simple methods like the trip meter reset or steering button controls take just a minute or two. Using an OBD scanner may take a few extra minutes to read and clear any codes. The battery disconnect method requires waiting 10 to 15 minutes for the system to fully reset.
Will resetting the maintenance light void my warranty?
No, resetting the maintenance light does not void your warranty. The warranty covers repairs and services based on your maintenance schedule, not whether the light is on or off. However, keeping up with your scheduled service and having records is important for warranty claims. Resetting the light after completing the service is perfectly fine.
What is the difference between a maintenance light and a check engine light?
The maintenance light is a mileage-based reminder for routine service like oil changes. It usually looks like a wrench or says “Service Due.” The check engine light signals a problem detected by the onboard diagnostics system and looks like an engine icon. The check engine light needs immediate attention, while the maintenance light is a scheduled reminder.
Can an OBD scanner remove the maintenance light on any car?
An OBD scanner can remove the maintenance light on most cars made after 1996, which is when OBD-II became the standard in the United States. Some very new or luxury vehicles may require a brand-specific scanner. A basic OBD-II scanner handles the vast majority of vehicles on the road today.
Why does my maintenance light keep coming back after I reset it?
If the maintenance light keeps returning, it usually means the underlying service need has not been addressed. It could also indicate a sensor issue, a computer glitch, or an incomplete reset. Try resetting the light again using the correct method for your vehicle. If it persists, have a mechanic inspect your car to rule out any real problems.
=== CONCLUSION ===
Removing an engine maintenance light is a skill every car owner should have. It is quick, easy, and saves you a trip to the shop. With the methods outlined in this guide, you can confidently reset your maintenance light using the trip meter, steering controls, OBD scanner, or battery disconnect method. Just remember to always complete the required service first, and reset the light only after the work is done.
Keep your car in great shape by following the manufacturer’s service schedule and resetting the light promptly after each service. If the light keeps coming back, do not hesitate to consult a professional. A well-maintained car runs better, lasts longer, and keeps you safe on the road.


